-

Month: March 2016

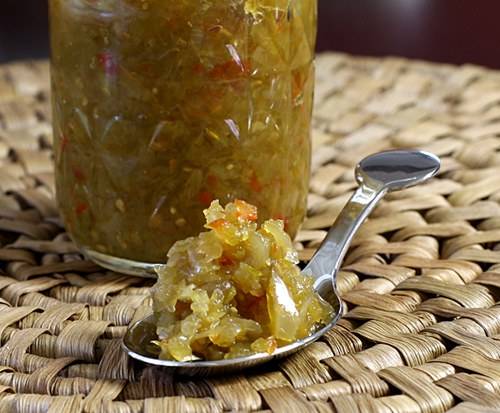
Home Made Green Tomato Relish for Burgers / Hot Dogs

Posted on

A sauce is typically a cooked liquid that is frequently reduced or thickened to intensify its flavor or texture.A relish often consists of minced vegetables (or, less frequently, fruit), that may or may not be accented with herbs, spices or liquids such a vinegar or brine.
Today we are going to learn how to make Relish and preserve …
Green-Tomato-Relish_19320


Its basically American Acchar …  Pickling takes time and patience … So patience here is the key word ….

Ingredients:

  • 2.5kg green tomatoes, roughly chopped
  • 0.5kg onions, finely sliced
  • 4 tsp / 30g salt
  • 1L malt vinegar
  • 0.5kg soft light brown sugar
  • 250g sultanas, roughly chopped
  • 3 tsp / 20g ground pepper

Equipment:

  • Preserving pan or other large lidless pan.
  • 7 – 10 jars with lids
  • Food wrap / cling film
  • Sticky labels
Finely slice your onions and washed green tomatoes, cutting out any bad bits. Add to a large bowl and stir. Add the 4 teaspoons of salt, stir again and then cover with food wrap or a large plate and leave overnight.

This will draw out lots of the tomato juices and help enhance the flavours. This step can be skipped if you don’t want to leave it overnight, just reduce the salt by half.

I thoroughly recommend doing this step as it will reduce the time you need to cook your chutney for. Much of the cooking time is just reducing the liquid down so it’s a thick enough consistency for chutney.

Step 3: Heat the vinegar, add the sugar.

The next day…

Place the litre of vinegar into a large pan. Add the 500g of light brown soft sugar and stir over a medium heat until all the sugar has dissolved.

Bring to the boil.

Step 4: Sultanas

Roughly chop the sultanas then add to the simmering vinegar and sugar. Bring the whole lot to a gentle boil.

Step 5: Drain and add the tomatoes and onions

Remove the cover from the tomatoes and onions that you’ve left overnight. Drain well but do not rinse. Rinsing will add more water and the goal of leaving overnight with salt was to remove as much water as possible without pulping them.

Add to the chutney and stir in well. Add the 3 teaspoons / 15g white pepper.

Bring to a gentle boil.

Step 6: Cooking time

Once all the ingredients have been added they need to be boiled gently for 1.5 to 2 hours until thick and golden. The goal of this cooking time is to reduce the liquid down so the chutney’s thick and to soften the tomatoes and onions until they take on the sugar and turn brown.

All you’re doing for the next 1 – 2 hours is stirring occasionally and adjusting the heat if they start to boil too vigorously.

You might as well get your jars ready now!

Step 7: Preparing your jars

Wash your jars and lids well in hot water. I used jars I’d saved from sauces and jams and scrounged from friends.

Place them in an oven preheated to 140 degrees Celcius (280 Fahrenheit).

This will dry and sterilise them.

Step 8: Is it ready yet???

When your chutney has reduced by almost half and is thick and golden brown, it is almost ready. Boil it a little longer, I’m almost certain you’ll be as impatient as I am and need to leave it just a tiny bit longer. I found a good gauge of it being thick enough was when I could drag my wooden spoon across the bottom of the pan and see the bottom for a little while after it had passed. When that happens, it’s ready.
Remove your sterilised jars from the oven and place on newspaper. At this point I realised I didn’t have any newspaper so I used chopping boards. Regardless, make sure you have something covering your work surfaces to make it easier to clean up, bottling the chutney will make a fair bit of mess.

Holding the hot jars in an oven mitt in one hand, spoon the chutney into the jars with the other. When full give them a quick tap on the bottom against the work surface to knock out any air bubbles then fill the next jar.

When all your jars are full place a double layer of cling film or food wrap across the top of each jar and then trim around it. As the chutney cools the air below the wrap will contract, sucking the cling film down against the surface, protecting it further from mould. You can see the concave shape of the wrap in the pictures.

Step 9: Labelling and topping off

 While the jars cool, write some labels showing the date, content and maker.
Once cool, add the lids and stick on the labels. You can start eating the chutney right away, or leave it to mature for one or two weeks. I couldn’t wait so had some warm with cheese and biscuits. Mmmmmm.

The finished chutney, if preserved well, should keep for six months or more.


Laksa Soup and Laksa Paste by Chef Saurav Bhatnagar , Oh Bao

Posted on


The new Shack menu embraces food specialities from the rustic mountains to the rough coastlines from around the world.  It has a new age approach keeping in mind the traditions & authenticity of every cuisine. You can very well call it a “global urban” menu.

For the patrons, there is a wide selection of fresh meat, poultry & seafood to choose from along with fresh & seasonal exotic vegetables. The food is elegant yet rustic in nature. The Chef at Shack has adopted the “rustic cooking style” which is unrefined and simple, but also warm and inviting. It is typically based on old-fashioned preparation techniques, seasonal produce and a unique set of cultural influences. The generation now may view it as retro-chic, earthy and exciting; the “pleasantness” of rustic cuisine lies in the eye of the beholder- Thats Oh Bao  at Defence Colony at New Delhi  from the group who owns Moets … Its name that every body knows and want to have soul exciting food .
 

At Moets , met Chef Saurav Bhatnagar …Mr. Saurav Bhatnagar
He is the Chef Manager in Oh Bao. Before he worked in Taj Mahal Hotel ( Wasabi by Mori Moto) Japanese Restaurant, Sheraton Hotel(Pan asian restaurant) and Carnival Crusine (USA).

Though Laksa paste is available in ready made form … But that taste comes only when it is made fresh … Chef Saurav Bhatnagar shared his recipe for making the Laksa paste as well as Malaysian Laksa soup …

Quick , easy and aromatic … key to Malaysian Recipes ….


Laksa paste

5 cm piece galangal, peeled and chopped
5 cm piece turmeric, peeled and chopped (or 1 tablespoon ground powder)
250 g French shallots, peeled
10 garlic cloves, chopped
20 dried red chillies, seeded then soaked in hot water for 30 minutes to soften (less if you don’t like it too hot)
6 large fresh red chillies, seeded and chopped
10 candlenuts
50 g dried shrimp, soaked in hot water for 10 minutes then drained
2 Tbs belacan (dried shrimp paste), toasted
2 lemongrass stalks, white part only, chopped

Method

put all the laksa paste ingredients in a food processor and blend to a fine paste.


Laksa Soup ( Non Veg )

Ingredients 

2 L water
500 g raw prawns, peeled and deveined, reserve the prawn heads
1 boneless, skinless chicken breast, butterflied
125 ml (1/2 cup) vegetable oil
400 ml coconut cream
200 g fried tofu puffs, halved
2 stalks curry leaves
450 g fresh hokkien egg noodles
200 g dried rice vermicelli, soaked in warm water for 10 minutes then drained
200 g bean sprouts
salt to taste


Method

1. Pour water into a large stockpot and bring to the boil, then turn the heat down to a simmer, add the chicken and let it cook for 20 minutes. Reserve the stock, remove the chicken, set aside to cool, then shred the chicken into small pieces.

2. Heat oil in a wok on medium heat, fry prawn heads for a minute, then add laksa paste and fry for a further 15 minutes. When it’s done, the paste should be dark brown and a layer of red oil will separate from the spices.

3. Tip everything in the wok into the chicken stock and bring to the boil. Pour in coconut cream, season with salt, add curry leaves and fried tofu puffs, then lower the heat and let the soup simmer until you are ready to serve.

4. Half fill another large pot with water and bring to the boil. For each serve, grab a small handful each of hokkien noodles and rice vermicelli, and a few prawns. Put them into a wire mesh strainer or a sieve and dunk the noodles and prawns into the hot water for 1 minute. Drain and shake off any excess water, then transfer to a serving bowl. Top the bowl of noodles with bean sprouts and chicken then ladle the hot laksa broth along with a few tofu puffs over the top.


Hollandaise Sauce with Eggs Benedict ( Muffin Tins used )

Posted on

English Breakfast means  Poached eggs … Poaching eggs is one hell of skill … I still get goose bumps thinking of  poaching eggs .. So here is simple way to Poach eggs or relish eggs Benedict the restaurant way …

Every Body has Muffin Tins in House … I read a article in the newspaper where a famous CHEF showed how to poach the eggs … To complete the poached eggs the Hollandaise ..

Iam Hungry … So lets start cooking …

Ingredients

  • 125g Butter – Salted Butter
  • 2 egg yolk
  • ½ tsp white wine vinegar or tarragon vinegar
  • pinch salt
  • splash ice cold water
  • lemon juice
  • cayenne pepper
  • Ham for Egg Benedict
  • Bunch of Asparagus
  • Cellary

To make eggs benedict

  • Muffin Tin
  • Eggs

Method

 Hollandaise  Sauce

  1. Melt 125g butter in a saucepan and skim any white solids from surface. Keep the butter warm. Put 2 egg yolks, 1/2 tsp tarragon vinegar or white wine vinegar, a pinch of salt and a splash of ice-cold water in a metal or glass bowl that will fit over a small pan. Whisk for a few minutes then put the bowl over a pan of barely simmering water and whisk continuously until pale and thick, about 3-5 minutes.
  2. Remove from the heat and slowly whisk in the melted butter, bit by bit until it’s all incorporated and you have a creamy hollandaise. (If it gets too thick, add a splash of water.) Season with a squeeze of lemon juice and a little cayenne pepper. Keep warm until needed.
  3.  I like a little  Celery so  chop the celary and mix with hollandaise

 Eggs Benedict in Muffin Tin … 

1 . Preheat oven to 350°. Lightly spray a 12-cup (non-stick) muffin pan with olive oil
2 . In a small pan, sauté mushrooms and shallot in butter with a touch of salt and pepper over medium-high heat. Stir approximately 10 minutes or until mushrooms are tender and the liquid has evaporated. Remove from heat and stir in sour cream and chopped tarragon.

3. Fit one slice of ham into each of the prepared muffin cups (ends will stick up and hang over edges of cups) and then carefully crack one (1) egg into each (do not break the yolk).

4. Bake approximately 12 to 14 minutes, depending on number of servings being baked. Check the eggs after about 10 minutes baking time. When done, the whites should be completely set and the yolks beginning to thicken but not hard. Remove from oven.

5. Using a spoon, remove eggs (in ham cup) from muffin cups carefully, placing on individual serving plates. Drizzle hollandaise sauce over egg, garnish with tarragon leaves and dress with a few spring of asparagus. To add a little more color, you can also sprinkle lightly with paprika. Arrange a few English muffin or toast triangles on the side and they are ready to be served. I usually fix two eggs per person… they will all be eaten.


Omellete with Spanish Tomato sauce .. Rustic Spain

Posted on Updated on

 Omelette  is best on table to start the day  and with that go a beautiful textured sauce … Oh man !  What best … Well Try this and one would be good mood for the whole day … Healthy Food yet all yummy . The Best of Egg and Tomatoes
1/4   butter
1 clove garlic, minced
2 onions, chopped
3 stalks coriander, chopped
1 green pepper, chopped
1/2 lb. fresh mushrooms, sliced
250 gms  whole tomatoes
1 cup tomato paste
1  white wine
1 tsp. sugar
1/4 tsp. oregano
2 tbsp. ketchup

Melt butter in pan . Add garlic, onions, celery, green pepper and mushrooms. Saute until tender. Add remaining ingredients and simmer for 30 minutes. Makes enough sauce so that one can enjoy …

Red Bean Chutney ( Spanish Dip with Indian Allo Tikki )

Posted on

Very simple yet delicious way to have snacks … Indian Allo Tikki which is famous snack item combined with Spanish dip made from Rajma ( Red Kidney beans and Corn )

Ingredients

  • 250 gms red kidney beans ( Rajma )
  • 1/3 cup cooked corn ( Canned Corn )
  • 1 teaspoon ground cumin
  • ¼ cup chopped onion
  • Juice of 1 lime
  • 1/3 cup fresh cilantro
  • ¼ cup olive oil
  • 1 teaspoon paprika
  • Salt and pepper

Directions

  1. Place all the ingredients in the food processor and mix until well combined and smooth. If you are not using canned Rajma or Kidney beans then boil some Rajma or Red kidney beans …
  2. Transfer the dip to a serving dish and top with fresh cilantro.